Large scale "Uncle
Sam"-style hat measures approx.
6" tall x 11.5" (brim) wide.
Construct body
from sturdy card stock or cover stock,
then decorate with the connected stripe
panels,
hat band, brim rim sections.
Position top and bottom layers of sparkler
"fringe" sections
around base of crown on top of brim (curl
"shoots" for fluffy-ier effect).
Or, add your own patriotic
decorations for a fun display.
The hat band can be decorated with the
dimensional 5 pt stars with supports design
as shown here (use two smallest star sizes).
The hat band can be decorated with the
dimensional 5 pt stars with supports design
as shown here (use two smallest star sizes).
ASSEMBLY: 1. Identify and cut the shapes:
A brim circle (cut 1 to 3 for strength)
B brim rim half rings
C crown side panels (6)
D crown strip accents (6)
E crown top hexagon
F bottom layer fringe accents (6)
G top layer fringe accents (6)
H hat band strips (2)
2. Layer the brim circles (if you have cut multiples)
and attach thoroughly.
(Or, layer 2 and wait to attach third until after
the crown lower tabs are attached, then attach
underneath main brim circles to hide
tab construction. See step 9)
3. Position and attach the rim trim arcs at each
upper layer edge.
4. Prepare each of the crown sections by
bending top and side tabs back, bottom tab
forward, horizontal perf lines forward.
5. Position and join side seams of first twosections, working one section at a time.
(NOTE: it may be helpful to assist accurate
alignment at top and bottom edges to begin
with center section first - NOT as shown here.)
One section . . .
. . . two . . .
. . . three.
6. Continue adding another section to the assembly
until all crown sections are joined, then . . .
. . . form the crown into a tube to complete the
final side seam.
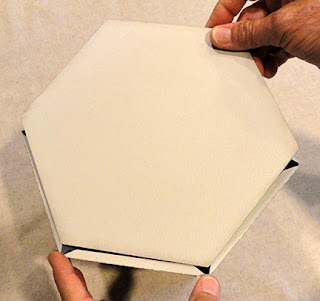
7. Bend top crown tabs inward, then positionand attach top hexagon, taking care to line up
edges with perf lines all around.
8. Prepare the strip accent sections by bending
at the perf cut halfway down each stripe.
Position bottom "stripe" edge along the
bottom section perforation line of the crown,
sides and top edges even with corresponding
edges of crown, and glue in place.
Attach all 6 stripe accents.
9. Insert the tabs of crown assembly bottom end through top of brim hex opening,
and bend outward. Glue in place to underside
of brim.
(After this step, if desired, glue the final
brim circle face out, against the underside
of hat assembly to hide the tab construction.)
10. Prepare the fringe accent shapes by
adding upward/forward curl, if desired,
to the spikes using the shaft of a tool
or equivalent as shown.
11. Position bottom layer of longer (blue) fringe shapes
around each face of the crown, attaching
to the face of the brim. NOTE that the side edges
of the fringe connector strip should line up
edge to edge to appear "seamless".
Repeat the process to layer the shorter (red)fringe shapes around the crown.
12. Prepare the hat band strips by bending back
on the end tab and other vertical perforation lines.
Join the strips end to end by overlapping straight
edge over corresponding tab perf line of the
second strip.
13. Position the hat band strip around the base
of the crown, wrapping to line up the perf lines
at the crown ridges. At the back, complete
the seam by overlapping and gluing.
At this point, the Uncle Sam top hat centerpiece
is complete.
However, if desired, prepare dimensional
"5 pt stars with back supports" svg design, and attach
around the hat band.
See details of the stars at tutorial on this blog.
For this project,
each of the six "faces" uses one of the middle size
stars (red), with one small (white) star and
one small (blue) star on each side.
Use hot glue or other quick-grab adhesive . . .
. . . to attach the stars. Take care at the sides
of each "face" of hat that star points don't
extend too far behind edge where they
may interfere with placement of stars on
adjacent sides.
Here is the completed Uncle Sam hat with
dimensional stars.


No comments:
Post a Comment