
Keepsake
box has window opening
and clear vinyl cut shape.
Or, use as a frame for
printed artwork
or a special photo reproduction.
Hinged lid is attached at back
wall panel.
Magnet columns are attached inside front corners
for an attraction
connection with metal washers
attached on lid underside.
Engineered walls
construction makes the tray
of this box durable. Offset accents on walls
plus
double "mat" accents for lid's window frame
provide scope for
creativity.
Measures approx. 6x6x2.


Embellish with "lace eyelet
panels" for sides and front panels,
and with
"dogwood flower leaf cluster" for lid decoration.
Add the custom fit "spiral square hole mini album"
design for the complete package.
Add the custom fit "spiral square hole mini album"
design for the complete package.
ASSEMBLY: 1. Identify and cut the shapes:
A front wall panel B back wall panel
C left side wall panel D right side wall panel
NOTE: these panels have been modified
to have slightly different slot locations or size
E box base F bottom cover panel
G optional eyelet lace panels (separate cut file)
H magnet discs and washers for closure
I lid main shape
J lid front build up shapes (3), accent plus offset accent
K under-lid build up shape (3) L clear vinyl panel

M magnet columns (2)
N column slot-together strut supports pair (2)

2. Identify the wall panels by locating the symbols
or letter cuts on the bottom flange tabs:
arrow triangle = front
circle punch = back
L = left R = right
3. Prepare the wall panels by bending back
on all panel edge and tab perforation lines.


(left accent panel is placed on the side wall
of the main lid shape).

5. Starting with the front wall panel . . .

. . . and identifying the front edge of the box base
by locating the 'F' letter cut in the margin . . .

. . . insert bottom tabs into the slots.
On the backside . . .

Repeat this step to insert back wall panel tabs
into corresponding slots opposite the front wall panel.

into appropriate side slots on base
and glue in similar fashion to front and back panels.

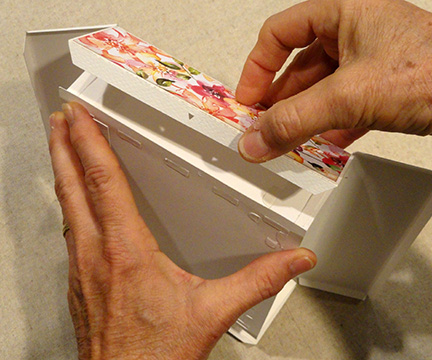
7. Bend front and side walls into perpendicular
positions for form corner, insert side wall tabs
(final cut file has pair of tabs in place of
the single longer tab shown in these tutorial images)
into front or back wall slot . . .

. . . then bend tabs toward the side
and glue in place.
Repeat the insertion of tabs into slots
and attachment for all corners.

8. Beginning with front wall (shown) and back wall,
fold the outer portion of the wall panel downward
to overlap the bottom flange tab around the edge
of the base panel, adjust as necessary side to side,
and glue in place. During the gluing process,
apply pressure to make sure that the base edge
remains snugly into the flange fold until secure.
(Complete the "wrap" and attachment
of front and back walls.)
9. Follow a similar process for the side walls,
wrapping outward and downward, with
top rim "miter" edge on top of the rim area
of the front or back panel as shown.
(Place a dab of blue under the miter edge
to help attach these edges in place.)

Tuck the side edge flange tab under the side plain
edge of the front or back wall panel, then
wrap the bottom flange tab over the base edge,
and glue in place. Apply pressure as much as
possible to bottom and also to side seams
until secure.

10. Position and attach the bottom cover
over the box bottom (to hide construction).
Use flat weights if possible to help keep the cover
flat and to help secure properly, if available.

11. Prepare two magnet columns by bending
back on all panel and tab perforations.

the plain side edge to overlap the long flange tab,
and join the seam.
(Insert a press-against tool such as a pencil shaft
into the tube to help secure the seam.)

then bend top "lid" down into position and glue
in place.

Square up the end and sides during
the gluing process.

bottom and glue to the underside of the top
of the column to secure in place there.

15. Prepare the support struts by positioning
in perpendicular arrangement
with the center slots one upward, one downward,
then sliding the two together until ends and even.
16. NOTE that one of the struts has a narrower panel
(between edge and slot).
Insert the assembled strut unit so that that short
portion inserts toward the flattened corner
(location of attached base lid) of the column "cube"
and push fully in.

bending tabs inward, lid down, and gluing in place.

LEFT and RIGHT corners, with bottom sitting
flush on base, and glue together
the three touching wall surfaces.
Hold in place until secure.

19. Position and attach the rim accent shapes,
first the square-ended strips, then the miter end
strips overlapping at the ends.

20. Prepare the LID build up unit by layering the
shapes, one by one, and gluing together,
taking care to align all edges as precisely as possible.

If using liquid adhesive, it will be advisable to use
a flat weight placed on top of the glued-up panels
to keep the assembly from warping or curling.
(Shown here is one example: a fabric-covered
re-purposed free weight bar, being used to
flatten a different shape - not the frame build up.)

to prepare the under-lid reinforcement shape
(note the cutout at front corners - shown here
at the bottom of the image).

22. Prepare the backside of the window opening
to hold the clear vinyl panel in place by
positioning and attaching an appropriate type
of adhesive.

For this sample project, clear adhesive tape
was used around window opening,
since many liquid adhesives will not hold
the vinyl securely.

23. Position the clear vinyl corner
on the backside of the main lid panel,
aligning corners with the INNER guide marks,
and secure in place.
at the backside edge of the under-lid build up unit
then . . .

. . . position and attachin place to cover the clear panel,
aligning corners at the OUTER guide marks.

in the cut-away corners
on the underside of the lid assembly.

26. Complete the lid face-side assembly
by aligning and attaching the two accent layers
together. Position and attach the accent layers
to the lid build up assembly, then attach
to the face side of the lid main panel,
lining up window edges as shown.
27. Position and attach the top wall accent
panel to the end panel of the lid assembly.

portion of the box, with the top wall panel
aligned over the top tray wall,
adjust so that the corner bend fits correctly
over the tray edge, then
attach securely.
This becomes the "hinge" connection.

Here is the completed box.
Now it is ready to embellish as you wish.

29. If you choose to use the lace eyelet accents,
following steps describe how these can be prepared.
* * * * *
Thread the lead end of narrow ribbon through first slot
(1/8" grosgrain used for model) coming UP from back
to front side. A lacing "needle" is being used here.
Carry ribbon across the large gap to be inserted
DOWN through second slot, then . . .

. . . across on underside to come UP through
third slot, etc. until ribbon is threaded
completely across.

Trim ends even with panel ends (or a hair shorter)
and glue in place on panel underside).

To tie a bow on one panel (front), thread ribbon
across as described. Secure lead end, then
work a loop through at the center large gap.
Estimate the amount needed to tie bow with ties,
then trim tail end and secure.
Cut at loop center and tie bow, trim excess, etc.

Position and attach lace and ribbon panels
onto each side of box in desired position.
Model has panels approx. halfway up.

Continue to embellish your box as desired.
Model includes "Mini Foundations" decorative
'feet' as shown here, plus . . .

. . . flower and leaf cluster (cut file available; see
assembly guide HERE).

A decorative metal knob with contrast
paper circle has been attached at center
beneath window opening,
and printed word panel has been
trimmed, and glued to build-up layers
at the side margin.
The "Spiral Square Hole Mini Album: (separate
cut file design) can be used to create
a sized-to fit memories or photo booklet
that fits include the box.


Can't seem to get enough of these boxes - they are so adorable and sturdy.... I made mine in Graphic 45's Botanicabella and used some metal handles and feet along with a cute metal butterfly. Love it. Thanks for another great box :-)
ReplyDelete